Quick Answer: A simple wooden play kitchen can be built from plywood or dimensional lumber with a child-height countertop, pretend sink, stovetop, storage, and optional oven. Plan the size around your child and available floor space first, then build a stable cabinet, smooth every reachable surface, and add only the play features you are comfortable constructing securely.
Start With the Child and the Space, Not the Cut List
The most useful DIY wooden play kitchen plans begin with two measurements: your available space and your child’s comfortable working height. A beautiful kitchen becomes surprisingly inconvenient when it sticks into a walkway or puts the pretend stovetop somewhere around a toddler’s chest.
I would measure the floor area first and mark it with painter’s tape. Leave enough room in front for your child to crouch down, open a door, and play beside another child without constantly backing into furniture.
For countertop height, look at where your child’s hands naturally rest while standing. A work surface around waist level is a sensible starting point because the child can reach the back without stretching. If you hope to use the kitchen for several years, a slightly taller counter can give you more growing room, but it still needs to be comfortable now.
When my daughter was younger, I learned how much reach matters from watching her ignore things placed at the back of a deep play surface. Anything she could comfortably reach became part of the game, while the far corners mostly collected stray wooden carrots.
Depth matters almost as much as height.
A compact kitchen around 12 to 16 inches deep can provide useful play space without becoming a bulky piece of furniture. Width is more flexible. A narrow one-piece kitchen works well in a bedroom corner, while a wider design gives siblings more elbow room.
Also Check: How to Build a DIY Wooden Dollhouse?
Choose a Simple Layout Before Buying Wood
A play kitchen does not need every appliance found in a real kitchen.
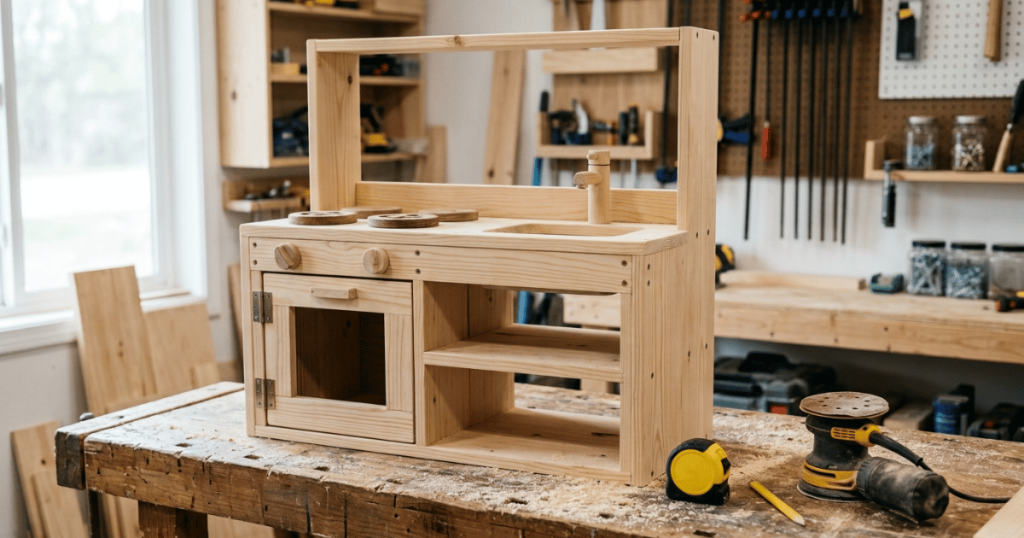
For a first build, I would concentrate on a countertop, sink, stovetop, and storage below. Those few areas already give children plenty to do: wash pretend vegetables, stir a pot, serve a meal, then put everything away.
An oven adds lovely pretend-play possibilities, but it also adds a moving door, hinges, a handle, and potentially a clear window. A refrigerator creates useful storage but increases the footprint. Think of these as optional modules rather than requirements.
Draw the front view and side view on paper before making a shopping list. Mark the counter height, total width, depth, shelf positions, and door openings. If you already have a bowl or small pan that will become the sink, measure that too.
This ten-minute sketch can prevent a lot of recutting.
What wood makes sense?
Plywood is practical when you want broad cabinet sides, shelves, doors, or a countertop from relatively few pieces. Half-inch or three-quarter-inch plywood can both appear in play-kitchen builds, while thin plywood or beadboard is commonly used where a lighter backing panel is enough.
Dimensional boards such as 1x12s offer another straightforward approach. Several beginner plans use them because the basic cabinet can be assembled from straight crosscuts rather than breaking down a full plywood sheet.
Use whichever approach suits the tools and woodworking experience you actually have.
Step-by-Step DIY Wooden Play Kitchen Plan
Step 1: Set the finished dimensions
Measure your child, measure the intended location, and decide on the finished width, depth, and counter height.
Then check doorways if you expect to move the kitchen between rooms. A play kitchen that fits beautifully against the wall is less useful if you cannot get it out of the workshop.
Step 2: Make a cut list
Break your sketch into rectangles: two sides, a bottom, countertop, shelves, back, and any doors or dividers.
Write the finished dimensions beside every piece before cutting. Remember that wood thickness affects measurements where one panel fits between two others.
Step 3: Cut and sand the main pieces
Make your straight cuts first and label the pieces lightly in pencil.
Sand faces, cut edges, and especially the areas little hands will touch. I pay more attention to reachable edges on children’s furniture than to hidden cosmetic imperfections because a tiny rough patch will eventually find a curious finger.
Step 4: Assemble the cabinet
Build the main box and check that it sits square and stable before adding decorative details.
Depending on your plan and materials, assembly may use screws, pocket holes, brad nails with wood glue, or a combination. Whatever method you choose, make sure fasteners are appropriate for the wood thickness and cannot poke through the opposite face.
Step 5: Cut the sink opening
Place your sink basin upside down on the countertop and trace it.
The supporting rim needs to remain on top of the counter, so the opening must be smaller than the basin’s widest outer edge. Drill a starter hole inside the waste area, then use a jigsaw to cut the opening gradually.
Test the fit before taking off more wood.
Step 6: Add the pretend stove
Burners can be simple wooden circles or securely attached flat shapes. Knobs are fun because turning them adds a small fine-motor action to pretend cooking, but make sure anything you attach is secure and appropriate for your child’s age.
You do not need electronics for a child to decide that dinner is bubbling away.
Step 7: Build doors and storage only where useful
An open shelf is the simplest storage solution and makes cleanup easy for younger children. Cabinet or oven doors add realism and can be worthwhile if you are comfortable fitting hinges.
Check the door through its entire swing. Look for places where fingers could be pinched, make sure handles have no sharp projections, and confirm that the open door does not make the whole kitchen unstable.
When my son was five, putting the wooden plates back on an open lower shelf became part of his restaurant game. That made me appreciate storage that children can see and reach rather than a complicated cabinet that looks more realistic to an adult.
Step 8: Finish and inspect the whole kitchen
Fill unwanted holes if necessary and sand again after assembly.
If you paint, stain, or seal the wood, choose a finish intended for the material and follow its instructions for application, drying, and curing before play begins. Once finished, run your hands over the kitchen slowly and inspect every edge, corner, screw, hinge, knob, and opening.
Small Safety Details Worth Planning Early
Stability starts with the shape of the kitchen itself. A broad, solid base is reassuring, while a tall back, hutch, or upper shelf changes the center of gravity and deserves extra attention.
If your design could tip when a child pulls or climbs on it, secure it appropriately rather than relying on its weight alone.
Avoid leaving protruding fasteners or rough plywood edges. Check attached knobs and decorative pieces regularly, particularly if younger children who still mouth objects share the play area. Moving doors also deserve occasional inspection as hinges loosen with use.
Rounded or softened corners are another practical detail. You do not have to turn every edge into a large curve, but a quick sanding pass can make sharp corners much friendlier during energetic pretend play.
The finished kitchen should feel sturdy when you push gently from different directions.
Make the Plan Easy to Change Later
One advantage of building your own wooden play kitchen is that you can leave room for the play to evolve.
You might start with an open cabinet rather than a refrigerator, then add a shelf later. A plain backsplash can eventually gain utensil hooks. Removable pretend burners are unnecessary if securely attached wooden circles already do the job.
Children often supply the complexity themselves through imaginative play. A sink becomes a washing station, the counter becomes a bakery, and a shelf full of play food becomes a grocery shop.
That kind of role play also naturally brings in language, sorting, turn-taking, and simple sequences such as preparing and serving pretend food. Turning knobs, arranging small pieces, and opening doors give hands plenty to do as well.
For us, those ordinary little routines have always been the interesting part of pretend toys. The construction creates the setting, but the children decide what happens there.
Frequently Asked Questions
What kind of wood should I use for a DIY play kitchen?
Plywood and ordinary dimensional lumber are both common choices. Plywood is convenient for larger panels, while boards such as 1x12s can make a straightforward beginner build with fewer large-sheet cuts.
How tall should a DIY play kitchen be?
There is no single height that fits every child. Aim for a countertop around your child’s comfortable standing waist level, and check that they can reach most of the work surface without stretching.
What tools do I need to build a wooden play kitchen?
The exact list depends on the design. A drill, saw, measuring tools, and sandpaper cover many simple builds, while more detailed plans may call for a jigsaw, circular or miter saw, brad nailer, sander, or pocket-hole jig.
How do you make a sink for a wooden play kitchen?
A removable bowl or small pan makes a simple pretend sink. Trace the basin, cut an opening smaller than its outer rim so the rim supports it, sand the cut edge thoroughly, and test that the basin sits securely.
Does a play kitchen need an oven and refrigerator?
No. A counter with a pretend sink, stovetop, and accessible storage already supports plenty of imaginative play. Adding an oven or refrigerator makes sense when you have enough space and are comfortable building the extra doors and hardware securely.